PostgreSQL 如何看懂 Explain
explain是SQL优化的前提。但explain的结果,无论是官方手册,还是别人写的博客,看完后点头如捣蒜,但往往看到自己SQL的执行计划时,并不很确定要优化的点在哪里。很大一部分原因是不知道各计划节点的具体含义,更确切地说,是不明白SQL执行的原理。比如,我们并不能很好地回答以下问题
- index scan、index only scan、bitmap index scan 有啥区别?
- 为什么明明有建立索引,但PG就是不用呢?
- 执行计划中有子查询就一定不好吗?
- hash join、merge join、nestloop join有啥区别?
- 。。。。。。
本文的目的,是让大家看懂SQL执行计划。毕竟,看懂了,才谈得上优化。
只有在了解数据库针对SQL做了哪些优化,才能制定出合理策略,利用优化器本身的特性达到最终优化整个SQL的最终目的,因此我们首先会介绍SQL优化器的原理;而本文的目的是让大家看懂explain,因此会介绍执行计划中最核心的部分——扫描节点和连接节点,大部分的优化思路都来自于此;文章的最后介绍explain命令得到的结果每一部分的具体含义,并介绍方便查看复杂计划的可视化工具。
查询优化器原理
在介绍执行计划前,先了解一下执行计划生成的原理。一条SQL从输入到执行完毕,大致会经历如下三个步骤
- 语法分析:词法分析、语法分析、语义分析
- 查询优化:基于规则的优化、基于代价的优化
- 查询执行、数据存取
explain的输出,是查询优化的最终结果。而查询优化又被分为两个步骤
基于规则的优化:即逻辑优化,通过对关系代数表达式进行逻辑上的等价变换,以获得性能更好的计划,比如谓词下推(将上层的过滤条件下推到下层)。
基于代价的优化:即物理优化,逻辑优化后,实际的查询路径还是有很多种,PG建立了代价计算模型,计算所有可能路径的代价,选出最优路径。
比如
select * from users where id = 1,在扫描方式上,有顺序扫描、索引扫描等。在不同的数据量情况下,按顺序扫描和索引扫描的代价可能是不一样的,因此它的执行计划可能会随数据量的变化而变化。
逻辑优化(基于规则的优化)
基于逻辑的等价变换,可对原始的SQL语句进行优化。逻辑优化的基本原则——将复杂逻辑变为简单逻辑。具体做的工作,大致是提升子查询、表达式预处理、having子句条件下推、group by冗余字段消除、谓词(过滤条件)下推、外连接消除等。
子查询提升
子查询可分为如下两类
相关子查询:子查询中引用外层表的列属性,导致外层表的每一条记录,子查询都需要重新执行一次
非相关子查询:子查询是独立的,与外层表没有直接的关联,子查询单独执行一次,外层表可以重复利用其结果
通常来说,相关子查询会被提升,非相关子查询由于其本来就只执行一次,因此没有太大必要提升。
1 | -- 相关子查询举例 |
相关子查询又可以依据子查询出现的位置分为如下两种——子查询和子连接,他们都能够被提升。
子查询语句:出现在FROM关键字后的是子查询语句
子连接语句:出现在WHERE/ON等约束条件或SELECT子句中的是子连接语句
提升子连接
子连接是子查询的一种特殊情况,由于它常出现在条件中,因此通常伴随ANY、EXISTS、NOT EXISTS、IN、NOT IN等关键字,PG会对他们尝试做提升,比如
1 | -- 查询那些打过标签的文章 |
能够被提升还有一个前提条件是子查询必须足够简单,上面同样的SQL,子查询投影改成聚集函数,就无法提升
1 | explain select * from content where exists(select sum(content_id) from content_to_label where content_id = content.id); |
提升子查询
出现在表位置的子查询,也能够提升,如下
1 | explain select * from content left join (select *, 1 from content_to_label) ctl on content.id = ctl.content_id; |
预处理表达式
即将能够事先处理的表达式处理掉,比如常量结算、约束条件的逻辑简化等
常量简化
即直接计算出SQL中的常量表达式
1
2
3
4
5
6
7-- 可以直接计算出101
explain select * from content where id < 1 + 100
Bitmap Heap Scan on content (cost=5.08..123.47 rows=104 width=739)
Recheck Cond: (id < 101)
-> Bitmap Index Scan on content_pkey (cost=0.00..5.06 rows=104 width=0)
Index Cond: (id < 101)谓词规范化(规约、拉平、提取公共项)
对无用的约束条件去除
1
2
3
4
5
6
7-- false对于或运算是没用的,会被优化器直接去除
explain select * from content where id < 100 or false
Bitmap Heap Scan on content (cost=5.08..123.45 rows=103 width=739)
Recheck Cond: (id < 100)
-> Bitmap Index Scan on content_pkey (cost=0.00..5.05 rows=103 width=0)
Index Cond: (id < 100)约束条件会被拉平
1
2
3
4
5-- 约束条件进行了无谓的括号,会被拉平
explain select * from content where id < 100 or (id < 1000 or id > 2000)
Seq Scan on content (cost=0.00..135.14 rows=978 width=739)
Filter: ((id < 100) OR (id < 1000) OR (id > 2000))约束条件经过逻辑运算后,会被提取公共项
1
2
3
4
5-- 约束条件提取公共项,只剩下id > 1 and id < 2
explain select * from content where (id > 1 and id < 2 and id < 100) or (id > 1 and id < 2);
Index Scan using content_pkey on content (cost=0.28..8.30 rows=1 width=739)
Index Cond: ((id > 1) AND (id < 2))
处理HAVING子句
HAVING子句的优化主要是将部分条件转变为普通的过滤条件,从而减少原始数据的大小。
1 | -- 统计发过发过10篇以上内容且用户id>10的用户 |
GroupBy键值消除
GroupBy子句需要借助排序或哈希实现,如果能减少它后面的字段,就能降低损耗。典型的是如果group by中出现了一个主键和多个不相关的字段,则仅保留主键即可,因为主键唯一不可重复,没有必要再对其他字段进行排序或hash操作了
1 | explain select * from content group by id, type, "authorId"; |
谓词下推
谓词即筛选条件,将上层的条件下推到基层进行扫描,会带来性能上的提升。
1 | -- 过滤条件下推 |
外连接消除
如果两个表是内连接,则他们之间的顺序可以任意交换,会方便谓词下推。而对于外连接,则不会那么方便。如果能够将外连接转换为内连接,则查询过程会简化。能够被转换为内连接的情况如下
1 | -- 常规左外连接 |
小结
逻辑优化的具体项目当然不止上面列举这几项,但从这几项中也能够看出逻辑优化的思路,即消除多余的逻辑操作,尽量从逻辑上降低实际查询时需要处理的数据量。同时我们也能够看到,子查询不一定不好,只要能够被合理提升、或是非关联子查询,对性能的影响不一定会很大;而你写的哪些看起来有些多余的部分,只要合理,也可能会被在逻辑优化中消除。
物理优化(基于代价的优化)
逻辑优化后得到新的查询树,PG会针对查询树生成各种不同的查询路径,并通过查询代价模型计算比较并得出查询代价最低的路径作为最终的查询计划。
cost计算模型
再数据库运行的实际环境中,用户的硬件环境天差地别,CPU频率、内存大小、磁盘介质等都会直接影响实际执行效率,因此代价估算无法十分准确。比较实际的是依据一套基本靠谱的模型,选出出各路径中代价相对最小的那一个作为最终结果。PG设定了一个相对单位1作为查询预估的最小单位,针对每种路径节点给与不同的单位数量,最终计算总代价的单位数量。
具体来说,代价计算要考虑的点主要如下
IO基准代价
从磁盘中读取数据以page为单位,而顺序读取比随机读取省时。PG默认顺序读取一个页面的代价为1,随机读取一个页面的代价为4
CPU基准代价
- 从页面中提取出具体的记录
- 对投影和约束条件中的表达式的计算成本
在PG中相关参数如下
- seq_page_cost:顺序扫描一个页面的IO成本,默认1.0
- random_page_cost:随即扫描一个页面的IO成本,默认4.0
- cpu_tuple_cost:获取一个元组(即记录)的CPU成本,默认0.01
- cpu_index_tuple_cost:通过索引获取一个元组的CPU成本,默认0.005
- cpu_operator_cost:执行一个表达式运算的CPU成本,默认0.0025
- parallel_setup_cost:并行查询时进程间通讯的初始化成本,默认1000.0
- parallel_tuple_cost:并行查询进行间投递元组的成本,默认0.1
选择率
pg_statistic表记录了各数据表字段的统计信息,比如表占据页面数量、表记录数量、字段null率、字段不重复记录的比率等内容,优化器会通过表的统计信息,根据SQL的筛选条件,得到针对该表的选择率(选中的记录数/总的记录数),选择率结合代价计算模型,得出最终的估算成本。
小结
成本估算是个非常复杂的工作,影响因素很多。于代价计算模型,除了那几个成本参数,还会考虑缓存对代价计算的影响,而缓存又有内存缓存和磁盘缓存;于选择率,由于统计表中的信息并不十分准确,随之造成选择率可能出现偏差,且针对联合投影的选择率计算又不一样,都会对最终查询路径的选择造成直接影响。因此尽管很多书籍和资料都有展示一个SQL的cost数字如何计算,但我认为实际的计算过程不应该轻易出现,一篇文章应有自己的定位,本文的目的是让大家看懂explain,而看懂explain只需要知道代价计算的原理,对各类扫描和计算成本的量级有基本的认识即可。没有强大的上下文介绍而直接上代价计算模型,对读者只会起到反作用(这是我看别人博客的切身感受)。
查询树介绍
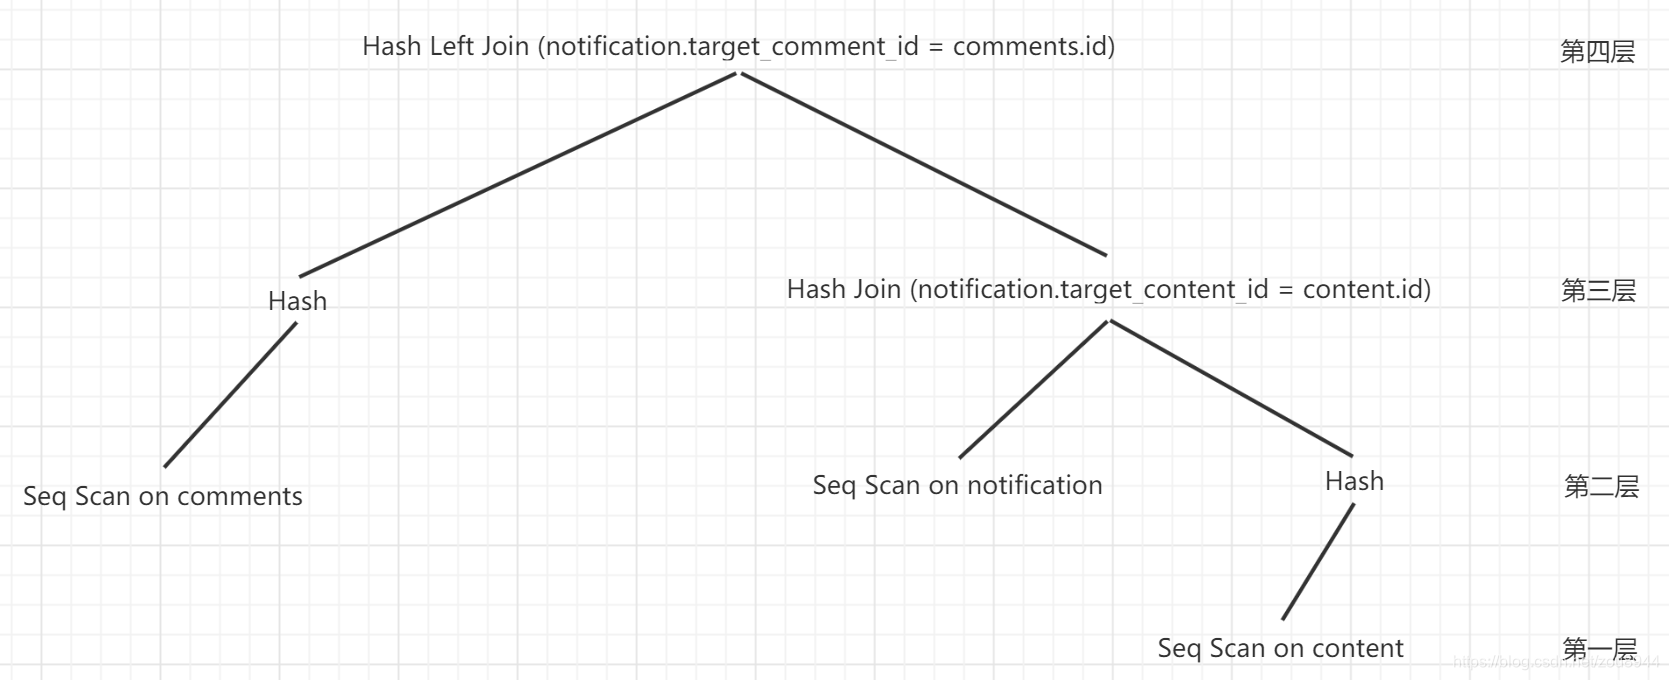
查询优化器最终输出的计划,以树的形式体现,树节点主要有控制节点、扫描节点、连接节点等。其中,所有叶子节点都是扫描节点,执行器按照从低到高的顺序逐层执行。下图是根据本文最后一个示例(见下文)的执行计划所绘制:三个叶子节点分别是对comments、notification、content的顺序扫描,其中comments和content扫描后进行创建了hash表,notification扫描结果和content扫描的hash结果做hash连接,得到的结果再和comments扫描的hash结果做hash连接,完成最终的运算。

下面介绍核心的三种扫描类型和三种连接类型
扫描
顺序扫描
即数据从头到尾扫描,适合连续的数据读取;不适合分布随机的数据。
索引扫描
Index Scan
先扫描索引,再根据得到的key获取具体数据,涉及到随机读,因此如果索引扫描得到的数据量过大时,大量随机读也会带来很大的性能损失。
1
2
3
4
5-- 通过索引获取少量数据
explain select * from content where id = 100;
Index Scan using content_pkey on content (cost=0.28..8.29 rows=1 width=739)
Index Cond: (id = 100)Index Only Scan
获取的目标字段就是索引的字段,因此仅扫描索引即可,即所谓的索引覆盖
1
2
3
4
5-- 直接获取索引的列
explain select id from content where id = 100;
Index Only Scan using content_pkey on content (cost=0.28..8.29 rows=1 width=4)
Index Cond: (id = 100)
位图扫描
针对Index Scan产生的随机读的优化,将索引读取到的key映射到位图,再扫描位图获取连续的key,将随机读变成连续读。出现位图扫描的地方一般会被分为两个步骤:索引映射到位图、通过位图扫描堆,即如下两个节点同时出现
- BitmapHeap Scan
- BitmapIndex Scan
1
2
3
4
5
6
7-- 通过索引获取较多数据
explain select * from content where id < 100;
Bitmap Heap Scan on content (cost=5.08..124.19 rows=103 width=739)
Recheck Cond: (id < 100)
-> Bitmap Index Scan on content_pkey (cost=0.00..5.05 rows=103 width=0)
Index Cond: (id < 100)上面的查询首先扫描索引,存储到位图(Bitmap Index),然后再通过位图扫描堆(Bitmap Head Scan),扫描时会再次检查条件(Recheck)
哪种扫描好
一般来说索引覆盖 > 索引扫描 > 索引+位图 > 顺序扫描,但也并非绝对。如果优化器认为序列扫描的代价小于索引扫描,肯定是使用索引。比如同一个语句,根据条件范围的不同,也会选择不同的扫描方式。上面展示了id=100时使用索引扫描;id<100时使用索引+位图扫描;这里展示id>100时的结果
1
2
3
4
5-- 由于表中数据量超过500,这里的约束条件选择了绝大多数记录,因此使用顺序扫描会更划算(索引扫描带来的随机读抵消了它带来的优点)
explain select id from content where id > 100;
Seq Scan on content (cost=0.00..130.51 rows=1058 width=4)
Filter: (id > 100)
连接
Nestlooped Join
即最普通的连接,笛卡尔积,算法复杂度为O(MxN),M和N是待连接表的记录数
1
2
3
4
5
6explain select * from content, content_to_label ctl;
Nested Loop (cost=0.00..2568.81 rows=195048 width=755)
-> Seq Scan on content (cost=0.00..127.61 rows=1161 width=739)
-> Materialize (cost=0.00..3.52 rows=168 width=16)
-> Seq Scan on content_to_label ctl (cost=0.00..2.68 rows=168 width=16)Hash Join
对内表先提取一个hash表,对外表的每条记录,都通过hash很快地找到内表记录,从而加快连接速度。哈希连接复杂度为O(M+N)
1
2
3
4
5
6
7explain select * from content, content_to_label ctl where content.id = ctl.content_id;
Hash Join (cost=142.12..145.24 rows=168 width=755)
Hash Cond: (ctl.content_id = content.id)
-> Seq Scan on content_to_label ctl (cost=0.00..2.68 rows=168 width=16)
-> Hash (cost=127.61..127.61 rows=1161 width=739)
-> Seq Scan on content (cost=0.00..127.61 rows=1161 width=739)该计划将content当作内表,先顺序扫描,再提取hash(Hash),将content_to_label当作外表,最后进行哈希连接,连接时会检查连接条件
Merge Join
即归并连接,仅当两个候选表有序时才会使用归并连接。
1
2
3
4
5
6
7
8
9
10
11explain select * from (select * from content order by id) content, (select * from content_to_label order by content_id) ctl where content.id = ctl.content_id order by ctl.content_id;
Merge Join (cost=201.57..217.40 rows=168 width=755)
Merge Cond: (content.id = content_to_label.content_id)
-> Sort (cost=186.71..189.61 rows=1161 width=739)
Sort Key: content.id
-> Seq Scan on content (cost=0.00..127.61 rows=1161 width=739)
-> Materialize (cost=8.89..11.41 rows=168 width=16)
-> Sort (cost=8.89..9.31 rows=168 width=16)
Sort Key: content_to_label.content_id
-> Seq Scan on content_to_label (cost=0.00..2.68 rows=168 width=16)如上,先对两个备选表排序,然后将排序key作为连接条件,优化器选择了归并连接。
哪种连接好?
如果待连接表本来就有序,那Merge Join会更好,否则Hash Join好,出现NestLoop Join是绝对要避免的。
其它
Materialize
即物化,常出现在带有子查询的语句中,当子查询结果较少时,PG会将其存储起来,这也是提升性能的一种方式
CTE
通用表达式对应的是WITH语句,它的作用和子查询类似,但具有一次求值,多次使用的特点,并不会多次执行,因此一般不会被优化。
1
2
3
4
5explain with contentt as (select * from content) select id from contentt;
CTE Scan on contentt (cost=127.61..150.83 rows=1161 width=4)
CTE contentt
-> Seq Scan on content (cost=0.00..127.61 rows=1161 width=739)SQL中存在CTE,其级别仅相当于执行一次的子查询。
Param
部分子查询的计划树中我们会看到
returns $0这样的内容。其原理是:子查询每次执行结果都会返回并存储在一个Param中,父查询通过向Param传参启动子查询,如果发现之前同样的参数已经执行过了,则直接获取之前执行获得的结果,从而节省运行时间。即,Param具有缓存作用。1
2
3
4Seq Scan on content (cost=0.02..126.53 rows=1151 width=743)
InitPlan 1 (returns $0)
-> Limit (cost=0.00..0.02 rows=1 width=4)
-> Seq Scan on content_to_label (cost=0.00..2.68 rows=168 width=4)
小结
执行计划的节点总类是非常多的,但核心的无非扫描和连接,再其次是子查询,这也是我们进行SQL优化重心所在:比如创建索引可以为优化器多提供一条选择路径;Nestloop Join出现时通常会带来较差的性能;子查询尽量优化为非相关的或连接操作。那遇到其他类型的节点怎么办?——当然是去查资料呀!
Explain怎么看 - 直接看
通过explain命令查看,常用explain + analyze同时查看计划成本和实际执行时间,注意analyze会导致SQL的确实执行。由于参数越多,出现的噪音越大,因此我的常用的习惯是先explain,再加上analyze查看具体情况。优化的思路是先找有没有一眼就看起来低效的节点,如Nestloop Join,无索引导致的Seq Scan等,其次重点关注cost耗费较多的节点。如下方性能损耗最大的是对content表的顺序扫描。
1 | explain select * from notification |
配上解说的版本
1 | -- 左连接,连接方式为hash,(代价估计:开始-结束为149.58..178.62,预估结果行数530,宽度为928) |
加上analyze的版本,可以发现多了每个步骤实际执行的时间、各步骤的实际情况(如hash所生成的bucket数量、内存消耗等)
1 | Hash Left Join (cost=147.29..175.52 rows=437 width=928) (actual time=0.734..1.287 rows=571 loops=1) |
Explain怎么看 - 可视化
pgAdmin提供了可视化explain的功能,支持将解释内容以图形的形式展示,使得更加方便地展示主干节点之间的关系和节点的意义,非常适合用来学习
比如同样描述上面的explain信息,图示如下
pgAdmin4的使用方式,点击explain按钮即可
总结
本文简单介绍了PostgreSQL的查询优化器工作原理、执行计划核心节点的原理,以及explain输出结果该如何查看,并从自己的视角介绍了执行计划中需要关注的点。写本文之前,作者对执行计划的了解主要来自PG官方手册及网上零零散散的博文,总感觉不得要领。而为了完成本文,阅读了《Postgresql技术内幕——查询优化深度探索》全本、《PostgreSQL指南——内幕探索》查询优化章节、《数据库系统概念》连接概念部分,收获颇丰,算是初步系统地了解了查询优化的原理,回过头再看explain的执行计划,豁然开朗;而最令自己的惊喜的发现是《数据库系统概念》,该书作为经典书籍,对构建自身的数据库系统基础知识很有益处。由于作者文笔水平有限,表述不一定清晰准确,如读者有时间有精力,参考资料一栏文章和书籍,都是值得一读的。
参考资料
- 使用EXPLAIN
- 为何我的索引没有被使用
- EXPLAIN 使用浅析
- PG_STATISTIC
- 《数据库系统概念 - 第六版》(参考连接部分)
- 《PostgreSQL技术内幕——查询优化深度探索》
- 《PostgreSQL指南——内幕探索》
- PGADMIN查看EXPLAIN结果